Hello everyone, thank you for stopping by. It’s Deb here today and in keeping with Karen’s challenge to the design team to use her new Zen Dragonfly releases in our projects this month I created this Zen Dragonfly garden journal.
I used the Zen Dragonfly Journal kit, Mina Branch chipboard and the Intersecting Circles and Brick stencils in the making of my journal, read on for my how to.
I started with the Zen Dragonfly Journal kit as I mentioned, the kit comes with a laser cut front cover and five pages, the word ‘journal’ and three ring binders but I just used the front cover and one of the pages plus the ‘journal’ word for my project.
I brayered white DecoArt acrylic paint over the front cover, not being worried about any areas that weren’t covered completely. I used the brayer to help keep any blobs of paint from obscuring the delicate details of the laser cut dragonfly.
Stenciling came next with the Intersecting Circles stencil and Broken China Distress Oxide ink. The colour was a little too intense so I slip slapped some more white paint over top to tone it down. I discovered that the Oxide ink migrated up through the paint here and there due to the wet paint activating the Oxide ink, love the effect!
I then added a coat of Distress Vintage collage medium over the stenciled cover.
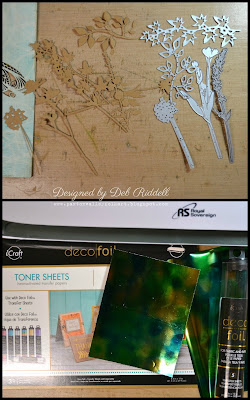
Die cutting came next, I used Tim Holtz’s Wildflowers, Wildflowers 2 and Garden Greens dies to cut flowers and leaves from kraft cardstock.
I then used my laminator to cover a piece of Therm O Web iCraft Toner sheet with Emerald Watercolour Deco Foil to place in behind the Zen Dragonfly laser cut. The play of colours in this Deco Foil is so gorgeous!
I wanted the back cover to look like a garden wall, so I inked it all over with Distress Oxide Vintage Photo ink and then used the Brick stencil with Distress paints in Rusty Hinge and Frayed Burlap. Again, the wet paint activated the Distress Oxide ink for a wonderful mottled effect. Once dried, I outlined each brick with a water soluble black pencil and then used a water brush to add shadows.
The Mina Branch chipboard piece was sprayed with a couple of colours of green Distress Spray stains, inked here and there with Twisted Citron and Cracked Pistachio Distress inks and then a bit of green Stickles Glitter glue was added to each of the flowers.
I then printed out a whole bunch of digital papers from Ephemera’s Vintage Garden onto copy paper or 110 lb cardstock. I used image from their Cottage Garden and Vintage Queen Bee journal kits, resizing the pages to fit the Zen Dragonfly journal. All of the pages were then tea dyed.
And then the journal was assembled. I adhered the Wildflower die cuts to the front cover with Distress Matte collage medium, shading around them with Gathered Twigs Distress ink. The ‘journal’ word was coloured with a brown marker and covered with Gloss varnish and adhered over top the Wildflower die cuts. Letters from Tim Holtz’s Alpha Tiles were chosen to spell the word ‘garden’ and adhered above the ‘journal’ word.
The Emerald Watercolour Deco Foil was adhered behind the Zen Dragonfly laser cut and one of the Garden Greens die cuts was added to the top of the journal cover with Distress Matte collage medium and shaded as previously described. A phrase from Tim Holtz’s Clippings Stickers was added and shaded as well.
Here’s a picture to show you the amazing play of colour from the Deco Foil, it is so lovely! Karen Bearse and I were obviously channeling the same muse this week because not only did she also use the Zen Dragonfly journal for her project but she also used Deco Foil behind here dragonfly!
Click here to take a peek if you didn’t see it ;O)
On the back cover, the Mina Branch was adhered overtop a couple of ephemera pieces. The calendar is from Tim Holtz’s Emporium Ephemera pack and the seed packet from Ephemera’s Vintage Garden. A length of Distress ink coloured Crinkle ribbon was used both to tie the journal closed and for the binding.
Here are a few pictures of the inside pages, all the papers and tags are from Ephemera’s Vintage Garden. A pocket on the front cover with a couple of tags.
Tuck spots with more tags on these pages.
Another envelope on this page with a tag.
And finally, a belly band with several tags on the back cover.
I hope that you’ve enjoyed seeing how my Zen Dragonfly garden journal came together, think it will be gifted to a very special person in my life who loves to garden, I hope she will like it!
Southern Ridge Trading Company Supplies Used:
- Brick Stencil
Other Supplies Used:
- Tim Holtz for Ranger Ink: Distress Oxide Ink, Distress Ink, Distress Spray Stain, Distress Paint and Distress Collage Medium
- Tim Holtz for Sizzix: Wildflowers Die, Wildflowers 2 Die and Garden Greens Die
- Tim Holtz/Advantus: Emporium Ephemera Pack, Alpha Tiles, Clippings Stickers and Crinkle Ribbon
- Therm O Web: iCraft Toner Sheets, iCraft Deco Foil and Mixed Media Adhesive
- Ephemera’s Vintage Garden: Cottage Garden Digital Journal Kit and Vintage Queen Bee Digital Journal Kit
- DecoArt: Americana Acrylic Paint and Gloss Varnish
- Miscellaneous: 110lb white cardstock, copy paper, computer and printer
Deb xo


Wow Deb, that dragonfly journal kit is absolutely gorgeous, all that intricate cutting is just so beautiful. I love how you decorated the front and back and the inside pages look wonderful! Anne x
ReplyDeleteThanks so much Anne! xo
DeleteLove this book!! Love what you have going on the inside- fun! Thanks for the shout out.
ReplyDeleteThanks Karen, love your Zen Dragonfly journal too! xo
Deletewe did good!
DeleteAwesome! xxx
ReplyDelete